

Get Reins of the Twilight Harbinger mount
 views
viewsOverview
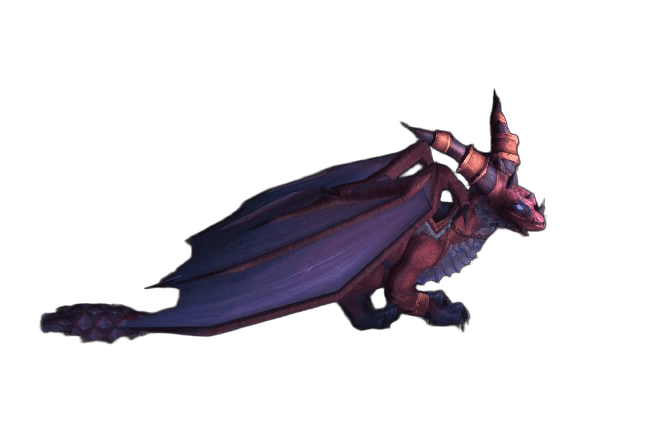
 Reins of the Twilight Harbinger is an epic flying mount added in patch 4.3 of the Cataclysm expansion. It is a majestic twilight dragon with dark purple scales, blazing eyes, and shimmering wings. The mount model is a unique variation of Alexstrasza's dragon in a twilight color scheme. The mount is awarded automatically upon completing the Glory of the Dragon Soul Raider meta-achievement — a series of 13 achievements in the Dragon Soul raid.
The Twilight Harbinger is one of three dragons obtainable in the Dragon Soul raid. The other two are the Reins of the Blazing Drake (a random drop from Madness of Deathwing) and the Life-Binder's Handmaiden (a drop from heroic Madness of Deathwing).
Why You Want This Mount
- Guaranteed acquisition — unlike boss drops, the mount is awarded for achievements. No reliance on luck — complete all 13 achievements and the mount is yours.
- Unique model — a dark purple drake with a twilight aura stands out among standard mounts. The bright glowing eyes and wings create a striking visual effect.
- Soloable — at level 80 in The War Within, all Dragon Soul bosses die in seconds, and most achievements can be completed solo without any difficulty.
- Quick to obtain — with a perfect run, every achievement except one can be completed in a single clear. The only exception is Rainbow Generation, which requires four separate clears.
- Account-wide — once obtained, the mount becomes available on all characters on the account.
Requirements
- A level 80 character (The War Within, Season 2, patch 11.1)
- Expert riding skill or higher
- The Dragon Soul raid must be run on Heroic difficulty (toggled at the raid entrance)
- A minimum of 4 weeks (4 separate clears) for the Rainbow Generation achievement
How to Reach the Dragon Soul Raid
The Dragon Soul raid is located in the Caverns of Time, in southern Tanaris (the Kalimdor continent). It is legacy Cataclysm-era content that is cleared without any trouble at level 80.
Quick Route
- Use the portal to the Caverns of Time from your faction's capital (Stormwind or Orgrimmar). The portal is in the portal room
- Inside the Caverns of Time, follow the path downward to the entrance of the Dragon Soul raid. The entrance is at the end of the main corridor, next to the End Time portal
- Before entering the raid, right-click your portrait and select "Raid Difficulty" → "25 Player Heroic" (for maximum loot and to complete the heroic achievements)
Entrance Coordinates
Alternative Method
If you don't have access to the portal room, fly to Tanaris and find the entrance to the Caverns of Time southeast of Gadgetzan.
Step-by-Step Achievement Guide
The meta-achievement includes 13 sub-tasks: 6 heroic boss kills and 7 achievements for meeting special conditions. The tactics for each achievement are listed below.
1. Heroic: Morchok
Boss: Morchok — the first boss of the raid.
Condition: Defeat Morchok on Heroic difficulty.
Solo tactic: At level 80 he dies within a few seconds. On Heroic difficulty a second boss, Kohcrom, appears, but both die instantly to any AoE abilities. Just attack.
2. Don't Stand So Close to Me
Boss: Morchok.
Condition: While Morchok casts Black Blood of the Earth, no raid member may be within 5 yards of another.
Solo tactic: Completed automatically when soloing — you are the only player in the raid, so no one can be within 5 yards of you. Just kill the boss.
3. Heroic: Warlord Zon'ozz
Boss: Warlord Zon'ozz — the second boss.
Condition: Defeat Zon'ozz on Heroic difficulty.
Solo tactic: Dies instantly. Attack right at the start of the fight.
4. Ping Pong Champion
Boss: Warlord Zon'ozz.
Condition: Deflect the Void of the Unmaking 10 times before it strikes Zon'ozz.
Solo tactic: This is one of the trickiest achievements to solo. Zon'ozz launches the Void of the Unmaking, which flies toward you. You need to deflect it by standing in its path, after which it flies back to the boss and bounces off him. Repeat this cycle 10 times. It's important not to kill the boss too early — remove all your gear or use a weak weapon to control your damage. The orb bounces off the boss automatically, and off you when you stand in its path. Watch the distance and position yourself between the orb and the boss.
5. Heroic: Yor'sahj the Unsleeping
Boss: Yor'sahj the Unsleeping — the third boss.
Condition: Defeat Yor'sahj on Heroic difficulty.
Solo tactic: Dies in seconds at max level.
6. Taste the Rainbow
Boss: Yor'sahj the Unsleeping.
Condition: Experience each of the following ooze combinations in a single fight: Black+Blue, Black+Yellow, Purple+Yellow, and Red+Green.
Solo tactic: Don't kill the boss right away. You need to wait until he summons oozes of the required colors and let them reach the boss. Black+Blue and Red+Green usually appear naturally. For Black+Yellow and Purple+Yellow you'll have to wait a few waves. Kill the unwanted oozes, leaving the required pair. At level 80 the damage from the boss's abilities is minimal, so you can calmly wait for the right combinations.
7. Heroic: Hagara the Stormbinder
Boss: Hagara the Stormbinder — the fourth boss.
Condition: Defeat Hagara on Heroic difficulty.
Solo tactic: Dies instantly. The only quirk is that Hagara periodically surrounds herself with an ice or lightning shield, during which she becomes invulnerable. At level 80 the shield phase passes very quickly. If you hit the Frozen Tempest phase, destroy the ice crystals. If the Lightning Conduit phase — conduct the lightning to the conductor crystals.
8. Heroic: Ultraxion
Boss: Ultraxion — the fifth boss.
Condition: Defeat Ultraxion on Heroic difficulty.
Solo tactic: Dies in one hit at max level. Don't forget to press the "Heroic Will" button if the fight drags on longer than a few seconds.
9. Minutes to Midnight
Boss: Ultraxion.
Condition: Defeat Ultraxion on Heroic difficulty before he casts Hour of Twilight more than once.
Solo tactic: Ultraxion casts Hour of Twilight every 45 seconds. At level 80 you'll kill him long before the first cast. The achievement completes automatically with a fast kill.
10. Heroic: Warmaster Blackhorn
Boss: Warmaster Blackhorn — the sixth boss.
Condition: Defeat Warmaster Blackhorn on Heroic difficulty.
Solo tactic: The fight has two phases. In the first phase, waves of enemies assault the deck of the Skyfire ship. In the second phase, Blackhorn himself lands. At max level all the adds and the boss die instantly.
11. Deck Defender
Boss: Warmaster Blackhorn.
Condition: Don't let a single Twilight Barrage hit the Skyfire ship during the fight with Warmaster Blackhorn on Heroic difficulty.
Solo tactic: Twilight Barrages are large purple swirls that fall onto the deck. To intercept a barrage, stand in its impact area and take the damage yourself. At level 80 the damage is negligible. Watch for the purple circles on the deck and run into each of them while killing the adds. The barrages stop after the assaulting drakes die, so try to kill the drakes quickly in the first phase. The key is to not miss a single barrage — watch the deck closely.
12. Maybe He'll Get Seasick
Boss: Spine of Deathwing — the seventh boss.
Condition: Make Deathwing barrel roll left, then right, then left again, then right again during the Spine of Deathwing fight on Heroic difficulty.
Solo tactic: One of the trickiest achievements. Deathwing barrel rolls when all players stand on one side of his back. The procedure:
- Kill one tendril on the left (or right) to free up space
- Stand on the left edge of Deathwing's back and wait — after a few seconds he'll start to tilt and barrel roll left
- As soon as the roll warning appears, immediately run to the right side
- Wait for the roll to the right and run to the left
- Repeat once more: left → right
- After four rolls (L-R-L-R), continue the fight as normal
Important: during the barrel roll you must hold on to Deathwing's back. If you get thrown off, the fight starts over. Don't kill more than one tendril at a time, or molten blood will appear, making movement harder.
13. Rainbow Generation
Boss: Madness of Deathwing — the final boss.
Condition: Defeat Madness of Deathwing, starting the fight on the platform of each of the four Aspects: Alexstrasza, Nozdormu, Ysera, and Kalecgos.
Solo tactic: This achievement requires four separate raid clears (one per week). In each clear, start the fight from a different platform. When you enter the fight, you choose which Aspect to leap to first — that choice is what counts.
Recommended platform order: Ysera → Nozdormu → Kalecgos → Alexstrasza. Alexstrasza's platform is the farthest of all, and a movement ability may be needed for quick access to it.
At level 80, Madness of Deathwing dies in seconds — just leap to the desired platform and attack.
Tips
Set Heroic difficulty before entering — all 13 achievements require Heroic mode. Right-click your portrait → "Raid Difficulty" → "25 Player Heroic". The 25-player mode gives more loot and gold.
First run — maximum achievements — in a single clear you can complete 12 of the 13 achievements. Rainbow Generation requires three more clears in subsequent weeks.
Control your damage — for the Ping Pong Champion and Taste the Rainbow achievements you need to not kill the boss too early. Remove your weapon, use auto-attacks or weak abilities.
Watch for Deck Defender — the purple barrage circles fall quickly. Keep your camera angled upward so you can see the incoming projectiles.
Deathwing's barrel roll — don't panic during the rolls. Run to the other side strictly after the warning appears, but before the roll itself.
Track the platforms — keep a record of which Aspect's platform you started the Madness of Deathwing fight on. Check your achievement progress in the achievement window (the Y key).
Loot per run — alongside the achievements you'll collect transmog loot from the Cataclysm era. Dragon Soul contains several sought-after transmog sets.
Legacy content — the raid is completely trivial at level 80. The only difficulty is the mechanical conditions of the achievements, not the bosses themselves. The entire raid is cleared in 10–15 minutes.
Author

Divine Tragedy
Has been playing WoW since 2010 and was active for a long time in player-run fan organizations dedicated to developing the Russian-speaking community across social media.

Comments
0No comments yet. Be the first to comment!