

Get Rampart Screecher mount
 views
viewsOverview
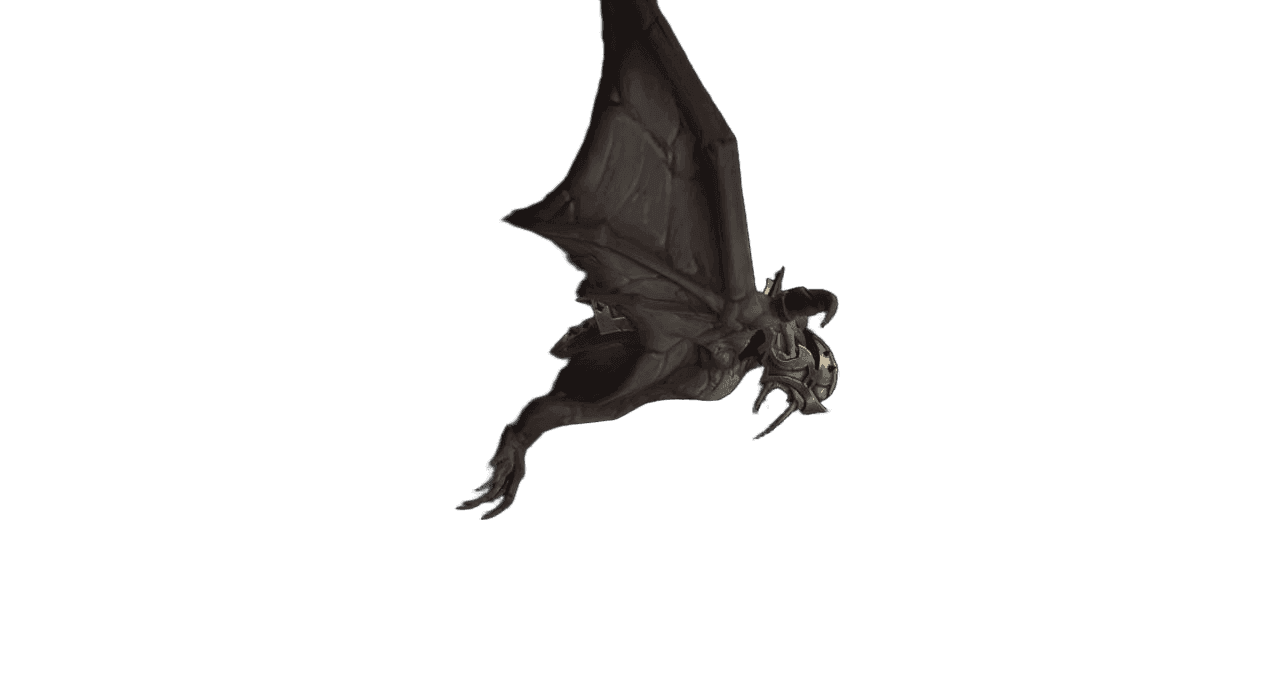
 Rampart Screecher is a flying mount shaped like a giant dreadwing that guards the walls of Castle Nathria. These stone creatures are trained to intercept threats approaching the castle from the air. The mount is awarded for the meta-achievement Glory of the Nathria Raider and becomes available to all characters on the account.
Castle Nathria is the first raid of the Shadowlands expansion, located in Revendreth. At level 90 in Midnight the raid is considered outdated content, and most bosses are killed within seconds.
Why You Want This Mount
- A unique dreadwing model from Revendreth — it doesn't drop, can't be bought, and is obtainable only through achievements
- A flying mount available to all characters on the account
- According to Wowhead, only 17% of players own the mount — a rare and eye-catching model
- Completing 10 achievements is a pleasant challenge for the solo player that breaks up the farming routine
- It counts toward your overall mount collection total
How to Reach Castle Nathria
The raid is located in Revendreth (Shadowlands). The fastest route:
- Open Chromie Time and select Shadowlands, or use the portal to Oribos from your faction's capital
- From Oribos, teleport to Revendreth via the "Sinfall" flight point
- The raid entrance sits at the foot of the central tower with the giant bat statue
Before entering, set the difficulty to Normal through your character portrait — achievements count on Normal difficulty and above.
Step-by-Step Achievement Guide
Below are all 10 meta-achievements, ordered by raid boss. At level 90 bosses fall in a few seconds, so the main task is to not kill the boss too quickly before you've met the condition.
1. Blind as a Bat
| Boss | Shriekwing |
| Achievement ID | Blind as a Bat |
| Condition | Kill 6 Stealthy Acolytes using Shriekwing's abilities |
How to complete:
- Before the fight, scan the hall — 6 piles of stones are scattered on the floor. A hidden Stealthy Acolyte hides under each one
- Place raid markers on the piles of stones for reference
- Start the fight and wait for Shriekwing to cast Piercing Shriek — it creates pools of Reverberating Ichor on the floor
- The pools reveal and kill the Acolytes. Your task is to guide the pools onto all 6 piles
- After all 6 Acolytes die, finish off the boss
Tip: At level 90 Shriekwing will die from a couple of hits. Remove your gear or attack with auto-attacks to prolong the fight and wait for the necessary abilities.
2. Taking Care of Business
| Boss | Huntsman Altimor |
| Achievement ID | Taking Care of Business |
| Condition | Lead the hounds Margore, Bargast, and Hecutis into different corners of the Kennel |
How to complete:
- The fight runs in three phases — one hound appears in each
- Lead the first hound (Margore) into one corner of the room. When it "takes care of business" (a mark appears on the floor), move on to the next
- Lead the second hound (Bargast) into another corner
- The third (Hecutis) — into a third corner
- After all three, finish off Altimor
Tip: At level 90 the hounds die instantly. Drag the boss into the right corner rather than attacking the hounds directly — they are tethered to Altimor.
3. Feed the Beast
| Boss | Hungering Destroyer |
| Achievement ID | Feed the Beast |
| Condition | Empty all 6 large anima canisters using Unstable Expulsion |
How to complete:
- Six large anima canisters are placed around the arena — mark them
- Wait for the boss to cast Unstable Expulsion — it creates a pool beneath you
- Stand next to a canister so the pool touches and empties it
- Repeat for all 6 canisters, then finish off the boss
Tip: Don't stand in the center — move to the canisters before each expulsion. You'll have to drag out the fight.
4. Burning Bright
| Boss | Shade of Kael'thas (Sun King's Salvation) |
| Achievement ID | Burning Bright |
| Condition | Light all 4 braziers during the second phase |
How to complete:
In the second phase the Shade of Kael'thas appears, and its abilities light the braziers:
- Blazing Brazier — stand in front of the boss during Fire Strike (a frontal attack)
- Dazzling Brazier — lead the boss to the brazier during Dazzling Flash
- Smoldering Brazier — lure the Reborn Phoenix to the brazier
- Ember Brazier — stand by the brazier when Ember Blast targets you
After lighting all 4 braziers, end the fight.
Tip: This achievement is harder to do solo, because the mechanic requires healing Kael'thas in the first phase. Classes with healing (paladin, druid, priest) will manage more easily. If your class can't heal, bring a healer companion.
5. Private Stock
| Boss | Artificer Xy'mox |
| Achievement ID | Private Stock |
| Condition | Return the anima of Maldraxxus, Ardenweald, and the Maw to the display cases |
How to complete:
- In the hall near the boss stand display cases and lie containers of anima
- Pick up a container of anima, use the boss's Stasis Trap to transport it to a display case
- Repeat for all three types of anima (Maldraxxus, Ardenweald, the Maw)
- Finish off the boss
Tip: At level 80 the boss may die before you transport all the anima. Remove your weapon and attack with auto-attacks, giving the boss time to cast Stasis Trap.
6. I Don't Know What I Expected
| Boss | Lady Inerva Darkvein |
| Achievement ID | I Don't Know What I Expected |
| Condition | Defeat the Dark Animus |
How to complete:
- At the start of the fight, summon an Animated Anima (a small add appears automatically)
- Wait 4 minutes — the add absorbs anima and turns into the Dark Animus
- Kill the Dark Animus within 66 seconds of its transformation
- Then finish off Lady Inerva
Tip: Don't kill the boss early — wait for the Dark Animus to appear. Remove your gear if your damage is too high.
7. Pour Decision Making
| Boss | Baroness Frieda |
| Achievement ID | Pour Decision Making |
| Condition | Throw 4 bottles of wine at the guests |
How to complete:
- During the fight, roughly every minute a Boisterous Waiter appears carrying a bottle of wine
- Click on the waiter to take the bottle
- Throw the bottle at one of the hall's guests
- Repeat 4 times, then finish off the bosses
Tip: Don't approach the gargoyles in the corners of the hall — they stun. Drag out the fight until you've collected all 4 bottles.
8. Dirtflap's Revenge
| Boss | Sludgefist |
| Achievement ID | Dirtflap's Revenge |
| Condition | Destroy the pillars in the order indicated by Dirtflap |
How to complete:
- Before the fight, find the NPC Dirtflap in the corridor to the right of the boss room entrance
- Talk to him — he'll enter the boss room
- Start the fight. Sludgefist periodically charges and shatters pillars
- Dirtflap flies to the pillar that must be destroyed next — aim the boss at exactly that one
- Destroy all 4 pillars in the correct order, then finish off the boss
Tip: Stand between the boss and the target pillar — Sludgefist will charge in your direction and destroy it.
9. Feed Me, Seymour!
| Boss | General Kaal (Stone Legion Generals) |
| Achievement ID | Feed Me, Seymour! |
| Condition | Defeat the generals while all players hold a Bouquet of Blooming Bloodroses |
How to complete:
- On the bridge before the boss room, pick up a Bouquet of Withered Bloodroses
- During the intermission, pick up an anima orb — it will make the roses bloom after 60 seconds
- All raid members must be alive and holding a blooming bouquet at the moment the bosses are killed
- Defeat the generals after all the roses have bloomed
Tip: When soloing, one bouquet on your character is enough. Pick up the roses, wait for the intermission, take the orb, wait for the bloom, and finish off the bosses.
10. Clear Conscience
| Boss | Sire Denathrius |
| Achievement ID | Clear Conscience |
| Condition | Remove all 4 stacks of Burden of Sin before the start of the second phase |
How to complete:
- At the start of the fight, 4 stacks of Burden of Sin are applied to you
- Periodically Denathrius casts Cleansing Pain — it removes stacks but deals damage
- Remove all 4 stacks before the boss casts March of the Penitent (the transition to the second phase)
- Once cleansed of the Burden, finish off Denathrius
Tip: At level 90 the damage from Cleansing Pain is negligible. Just stand in the area of effect and let all the stacks be removed before moving on to killing the boss.
Completion Tips
- Most bosses at level 90 die instantly. The main problem is not killing the boss before meeting the condition. Remove your weapon, use auto-attacks, or equip weak gear.
- Sun King's Salvation is the only fight where a companion may be required. The mechanic requires healing Kael'thas in the first phase. Paladins, druids, and priests will manage solo; other classes will find it easier to bring a healer.
- Achievements don't have to be done in a single run. Meta progress is saved — complete a few achievements at a time and come back for the rest.
- Set the difficulty to "Normal" before entering. Achievements count on Normal, Heroic, and Mythic difficulty, but Normal is the easiest.
- Shadowlands Chromie Time speeds up access to Revendreth via Oribos. If you already have the "Sinfall" flight point, fly straight to the raid.
- All achievements can be done in 1–2 runs if you study the mechanics in advance. The first run will take 30–40 minutes, subsequent ones significantly less.
Author

SophiaHoney
Started playing back in Pandaria, when the pandaren were still a novelty. Got stuck on Monk because it's the only class where you don't get dizzy after a dash. Tries to manage both tanking and kicking enemies in the face.

Comments
0No comments yet. Be the first to comment!